
You have undoubtedly heard about Google’s shift to Universal Analytics, but with the 10 million other responsibilities you have as a digital marketer, there is a good possibility the upgrade has not been a top priority.
It should be, and here’s why:
-
If you do not upgrade your property to Universal Analytics, the transfer will happen automatically (if it hasn’t already).
-
Failure to implement the Universal Analytics tracking code will mean your data can’t be processed (whether you’ve manually transferred your property or you’ve upgraded by default).
In short, use it or lose it. Once Universal Analytics roll out is complete, if you haven’t complied, you’ll lose the data. Google has released a timeline of the roll out, and we’re currently on phase three (of four!). Phase four is when the old tracking code is null and void. So it’s time to get moving.
And on the bright side, Universal Analytics has a ton of new features that should not be ignored, especially with the new year right around the corner. Here’s a complete breakdown of how the new system works and how to upgrade appropriately.
Why did Google make the change to Universal?
Google made the change for the same reason Apple makes changes to IOS: Better software with more functions and capabilities. This is a good thing in the long term, and Google’s provided a long list of the benefits of Universal Analytics. (And bonus for websites using subdomains: Universal Analytics will make data collection much simpler). Google intends to have 100 percent migration in the next two years, at which point, (again!) all other forms of Google Analytics will no longer be supported.
How do you make the upgrade?
Upgrading isn’t too difficult, but there’s good news and bad news.
The good news: It’s free! Also, Google has a giant resource center to help you and has a section devoted to making the switch.
The bad news: It is massive and the language can be a little tough to navigate.
It pretty much boils down to three steps – and the first two are CRITICAL. These include: Migrating the property, updating the tracking code and tailoring your data.
Step 1: Migrate the property (CRITICAL)
There is a good possibility that Google has already migrated the property for you. This involves updating the options in the admin section in your Google Analytics account. It prepares the property to start collecting data coming from the Universal Analytics javascript.
How to check if your property has been migrated to Universal:
Go into your admin section. If you see this, it means you have to update yourself. Click the button, follow the directions, and use this guide along the way.
If you see something like the image below, it means that Google has migrated your property for you:
![]()
Step 2: Update the tracking code (CRITICAL)
Although the property is migrated, the tracking code needs to be changed as well. This is very important, because without updating the code, you will not be able to use any of the features that are unique to Universal Analytics.
First, take a look what code currently is on your pages (you should also take a look at your subdomains and see if there are any inconsistencies). To do this, pull up your site up on a browser, right click, and select “view page source.” Use search to find the code (try ga, gaq, tag or analytics).
If you see this:
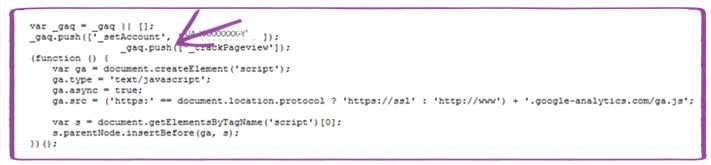 It means it’s “Google Analytics Classic,” and it will need to be deleted and replaced with your Universal Analytics tracking code. You will know because it will contain”_gaq.push”.
If you find that “tag manager” comes up, there is a good possibility that you are getting analytics on your site through Google Tag Manager. That is a whole different story, but here is a good resource to help you.
If you find the Universal code is already there, you can move to Step 3.
If you are still under “Google Analytics Classic” you will need to replace the older “classic code” with “Universal” and this can be done a number of ways. The easiest way is to add it directly to your site’s template to ensure that the code is on every page.
Here’s how:
- 1. Check to see if any of your plugins that use analytics will be impacted by updating to Universal
- Go back to the admin section in analytics
- Select tracking info, then tracking code
- Copy the script and paste it into the template
- Place the code right before the </head> tag
Another option is to download a CMS plugin that will add the code for you. Again, just be sure that the plugin supports Universal Analytics.
At this point, let’s discuss what exactly you put onto your site and how it works. Here is an overview of the Universal tracking code:
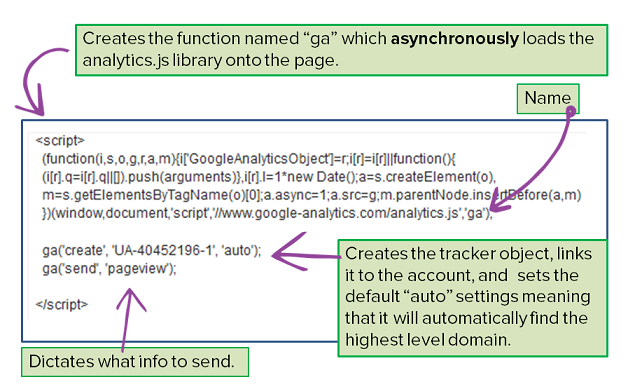 Universal Analytics can track a large amount of data in a variety of ways (all of which can be customized on the java script level). However, “pageview” is the standard command or “call” for data collection and sends a lot more than just pageviews. It will provide you most, if not all, the reporting data you will need. One of the best features of Universal Analytics is that it automatically tracks data across root domains and their subdomains without needing any manipulation to the javascript (so long as it is set to “auto”). It is also much easier to track data across different domains.
You can find more details on cross domain tracking in the developer resource center. Aside from the Universal code tracking user data, it also collects the data for event tracking and ecommerce.
Event tracking is done a little differently with Universal rather than Classic analytics:
- You may have previously set up a call for event tracking like this:Analytics Classic follows event tracking with the format _trackEvent(category, action, opt_label, opt_value, opt_noninteraction). In Universal Analytics, event tracking is slightly different. It follows this format:
- You’ll notice that “ga” now matches the name for the analytics tracking code and the rest of the call scripts. Like most things in Google Analytics, there are a few different ways to do event tracking and you can find more information on the event tracking page in the developer guide.
- You may also want to update your goal tracking if you have goals linked to events. This can be updated in the admin section of your analytics account.
- Ecommerce has changed quite a bit in how it reports, and the data it can collect. There is now a plugin that can be activated with the java script to collect even more insights into the shopper’s behaviors across the sales funnel. This guide has ways to implement ecommerce tracking from scratch as well as how to migrate your existing ecommerce setup over to the advanced settings.
Step 3: Tailor your data
![]() What makes Universal Analytics so unique is the ability to customize your data in order to get more detailed information about your website traffic. A majority of these features can be found in the admin section under “tracking info”:
What makes Universal Analytics so unique is the ability to customize your data in order to get more detailed information about your website traffic. A majority of these features can be found in the admin section under “tracking info”:
- User ID – Allows you to add a unique ID to each visitor and track how that person interacts with your site across devices such as desktop, mobile, and tablets. This requires some additional customization and requirements which you can learn more about it in Google’s guide.
- Session Settings – Dictates how long (or short) a session or campaign can last before it times out. By default, Google Analytics will sign someone out if they are idle for 30 minutes. This could be problematic if you have long content or sophisticated features, like a long white paper on your site that may cause someone to be idle for a period of time. Without updating the session settings, the visits could be misreported.
- Organic Search Sources – Add search engines to your list so they appear as organic traffic and not as a referral. You can also augment the list to show off different versions of a search engine such as google.de or images.google.com. As expected, Google has a guide, but it is a little more complicated than they make it seem. This article by Sean Carlos of Antezeta actually explains the process well.
- Referral Exclusion List – Tells Google Analytics which referral sources should be considered regular site property. This is how you can easily link traffic from subdomains over to the main domain or get rid of self-referring traffic (referral traffic that seems to be coming from your own website). This can also be helpful if you have a shopping cart subdomain and need to make sure all the pages are linked for ecommerce reporting. The process is very straightforward and really doesn’t have any fine print. It does seem to be case sensitive, so be sure to match the URL with the way it is reported.
- Search Term Exclusion List – Has organic traffic from branded keywords recorded as direct visits. Ever get the feeling that a majority of your organic traffic is coming from branded keywords like your product names, or perhaps people just entering your company name in the search bar? The Search Term Exclusion List will give you more accurate insights into your organic footprint for non-branded organic traffic.
Hopefully at this point you have successfully upgraded to Universal Analytics. The value will be well worth the time and effort. The data that is collected from the platform is invaluable. Not to mention that Google seems to be releasing more comprehensive features all the time.
Here’s an example of how we used Universal Analytics data to find out who was converting on one of our clients’ websites: Content ROI – How to find out who’s converting on your site.